How to stop Windows Update Slowing down the computer
Windows Update Slowing down the computer.
If you find that sometimes your computer is running slow, and you try to find out, and you see Windows Update is downloading or installing an update, and it's impacting you, I work in computer servicing and I commonly see complaints such as:
Windows Update is slowing down my internet.
Windows Update is taking all my bandwidth.
Windows Update high CPU usage

Note: In Windows services, the service name is "wuauserv" for Windows Update Service.
Here, I've documented some steps to manage Windows updates, including lighter options through the Windows settings, as well as a more comprehensive approach to ensure that Windows updates run in the background.
Windows Update: How to set internet bandwidth usage limits
This option is available in both Windows 10 & 11 and has been given the name Delivery Optimisation.
So head into "Settings" > "Windows Update" > "Advanced Options" > "Delivery Optimisation"

It's best to ensure "Download options" > background limit as a % with a very low number of 5%

Also, for "Upload options", ensure the limit is set as a percentage with a very low value, such as 5%. This time, it's a slider. Additionally, the Monthly upload limit (GB) is set to 5.
This will ensure the download of updates in the background is done very slowly and never a critical internet-hogging monster.
Windows Update automatically delays non-essential updates and prioritises security updates only.
There is a feature that allows you to select which updates you want. If you do want them, you can choose whether to receive them now or wait for a major update a few months after everyone else.
These features only have a nice interface in the "Windows Professional" or higher version; if you have Windows Home, you will either need to upgrade or manually make the setting changes using Regedit. For now, let's use the Windows Professional interface within the Group Policy Editor.
Using the Group Policy Editor.
Press Windows + R, type gpedit.msc, then hit Enter
Head into "Computer Configuration" > " Administrative Templates" > "Windows Components" > "Windows Update" > "Manage Updates offered from Windows Update"
ref: Manage Updates offered from Windows Update

What to set.
Select when Preview Builds and Feature Updates are received → Enabled → Set to defer for 90 days.
Select when Quality Updates are received → Enabled → Defer for a few days (e.g. 7 days).
Set Windows Update to Low Priority and use only 1 CPU/Core.
This is an extreme option, but the only way to ensure that once you have a real update downloaded, it will be installed at a very low-priority job in the background is to have a process which sets this for you. There are many ways to accomplish this, but here is an explained, simple approach that utilises built-in Windows features and a script.
Which Windows update events are being logged?
We can trigger an event, so we need to first get a picture of what Windows Update puts in the system event logs, from which we can trigger a script to set the priority.
Use Windows Event Viewer to find window update events
Press Windows + R, type eventvwr.msc, then hit Enter
You open "Windows Logs" > "System". Either find a mention of Windows update by hand or use the right-hand menu "Filter Current Log" to access Windows update.
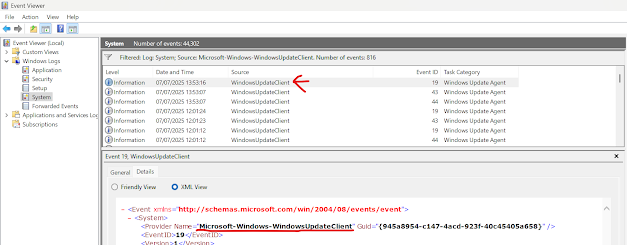
The three key pieces of information that trigger an event are the source, which is "WindowsUpdateClient", the Provider Name "Microsoft-Windows-WindowsUpdateClient", and the event ID, which we can see is used in event IDs 19, 20, 43, and 44.
If you open "PowerShell" and run the following script, it will get all the unique event IDs for the provider Name for us with a count of how many times it's been logged.
PowerShell script:
Get-WinEvent -LogName System |
Where-Object { $_.ProviderName -eq "Microsoft-Windows-WindowsUpdateClient" } |
Group-Object Id |
Sort-Object Count -Descending |
Select-Object Name, Count
PowerShell example output:
Name Count
---- -----
44 293
43 265
19 226
20 44
VB Script to lower service window update priority and affinity.
We need a script to take any found Windows update process and set it to low priority, and will only use 1 CPU/CORE by setting the process affinity for us.
This script will also check if there is a subprocess, also known as a child process, from the Windows update service and ensure it has the same enforcement of low priority, etc.
<Download Link to "ServiceEnforcer.VBS"> or <Tell me more on this script link...>
I suggest you have a dedicated folder if you don't already have one for your scripts.
e.g.
C:\Users\YourUserName\Documents\MyScripts
This script will create a log file in the same directory when it runs; in this example it would be called "ServiceEnforcer_[wuauserv]LOG.txt"
Setting up Windows task scheduler to help deprioritise Windows updates.
This built-in window task scheduling tool can be triggered by the Windows event ID we found in the Windows update service, and call this script to enforce the lower priority for us.
There are always multiple ways to achieve this, and you can have one script triggered by many events in one, but I recommend setting up a job for each one. In this example, repeat step 4 four times for event IDs 19, 20, 43, and 44.
These are the steps for 1st one. event ID = 20
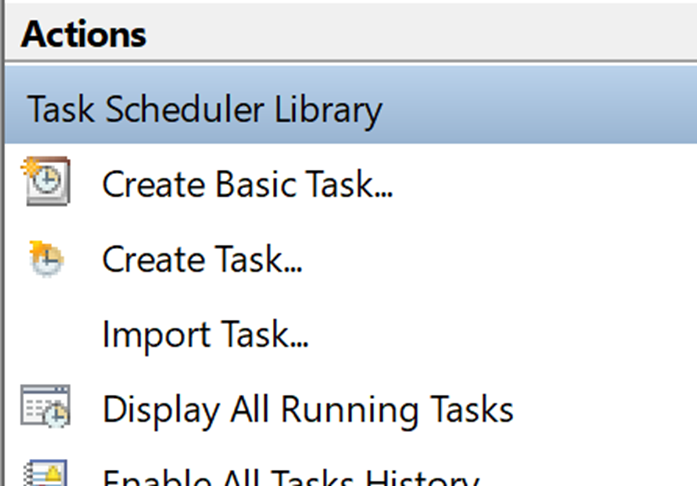
Click on the Windows start button and type "Task Scheduler", then launch.
Step 1: On the right-hand menu, select "Create Task"
Step 2: Then complete the 1st tab, known as "General"

A Name: ServiceEnforcer [wuauserv] [20]
Description: Check for server [wuauserv] triggered from the event [20] and run a script to enforce the service is LOW priority and can only use 1 CPU core.
Selected: Run only when the user is logged on
Selected: Run with the highest privileges
Step 3: Then on 2nd tab "Triggers" press "New..."
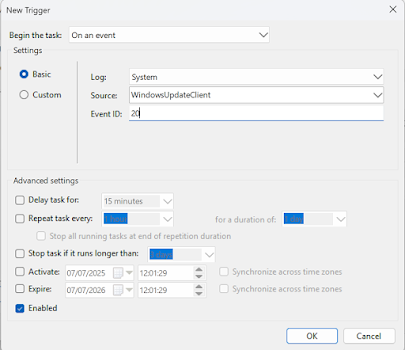
Begin this task: On an event
Log: System
Source : WindowsUpdateClient
Event ID: 20 (for this example)
Selected: Enabled.
Press "OK"
Step 4: In the next tab, "Action", press "New..."
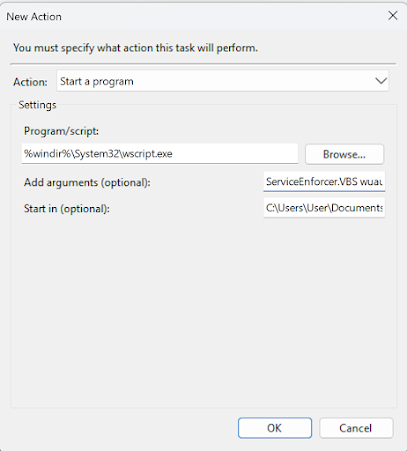
Action: Start a program
Program/script: %windir%\System32\wscript.exe
Add Arguments: ServiceEnforcer.VBS wuauserv 44
Start in: C:\Users\UserName\Documents\MyScripts (location your storing ServiceEnforcer.VBS)
Step 5: The tab "Conditions"

check:
Ensure deselected: Start the task only if the computer is connected to AC power.
Step 6: The last tab "Settings"

All the scheduled event IDs
You have now created a trigger to call the script for the 1st event, do this same step for the next 3 events, you should have a list of task scheduled like below.

You can right-click each one and choose run to ensure the log file in the directory where you stored the script is getting created and showing it working.
Here is an example log output:
07/07/2025 12:01:04 >>> Started Service [wuauserv] Background Enforcer(Event ID[44])
07/07/2025 12:01:05 >>> Check for service [wuauserv] found PID:26760
07/07/2025 12:01:05 >>> Yes service [wuauserv] PID [26760] Set to LOW priority
07/07/2025 12:01:05 >>> Yes service [wuauserv] AFFINITY [26760] Set to CPU 1
07/07/2025 12:01:06 >>> Yes service [wuauserv] PID [26760] Has a child sub process [27340]
07/07/2025 12:01:06 >>> Yes service [wuauserv] PID [27340] Set to LOW priority
07/07/2025 12:01:06 >>> Yes service [wuauserv] AFFINITY [27340] Set to CPU 1
07/07/2025 12:01:06 >>> Finished Service [wuauserv] Background Enforcer
Conclusion
Managing Windows updates doesn’t need to be a frustrating or disruptive experience. With the right approach, you can control bandwidth usage, prevent CPU spikes, and delay non-essential updates—keeping systems stable and performance smooth. These strategies aren’t just about convenience; they’re about maintaining productivity, particularly for small businesses where every bit of computing power counts.
At Optimised Computing, we understand the nuances of Windows maintenance—from registry tweaks to Group Policy configuration—and we routinely implement tailored solutions to help our customers stay ahead of disruptive updates. Whether you're a home user or a growing business, we make sure your systems update on your terms, not Microsoft's.
If you'd rather focus on running your business than troubleshooting update hiccups, let Optimised Computing handle the heavy lifting