

iPad 9th Generation (A2602) With a Completely Black Screen: How We Traced It to a Failed Backlight, a Corrupt iPadOS Install and Two Bent Connector Pins
The iPad that looked completely dead
This one came in as "it just doesn't work any more". No picture, no sound, no response to any button. It had been flat in a drawer for months. Every obvious sign said the logic board was gone.
It wasn't. Underneath there were three separate faults stacked on top of each other, and each one masked the next. This is the full diagnostic sequence we worked through, including the two points where the evidence pointed the wrong way — because those are the parts that cost people money.

Ipad not turning on, black screen, looks dead.
First question: is it actually taking a charge?
Before anything else, put an inline USB power meter between the charger and the iPad. It turns "is it charging?" from a guess into a number.
This iPad was drawing 5.12V at 2.30A, about 11.8W. That told us two useful things straight away.
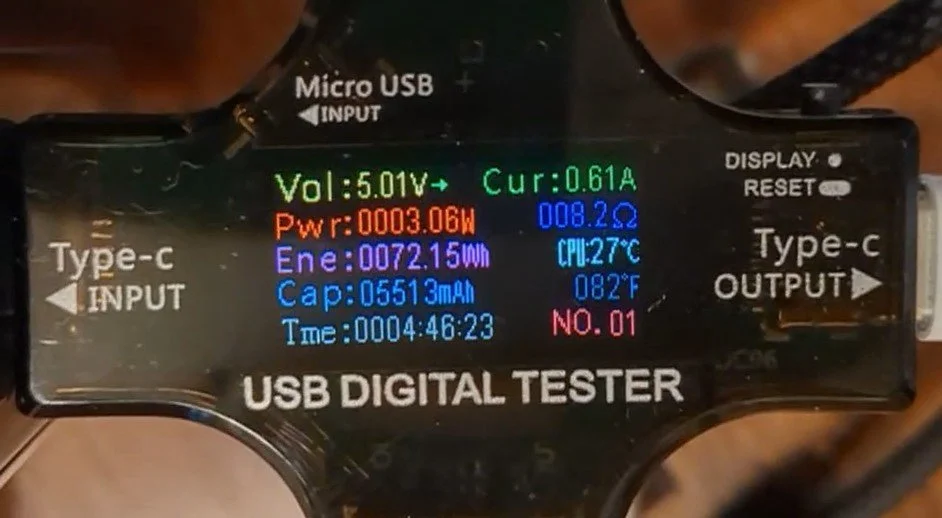
IPAD shows sign of charging responding to power with USB digital inline power tester
It was accepting real power. A genuinely dead battery, or one still in its deep-discharge pre-charge phase, draws a few hundred milliamps at most. Nearly 12W means the cell was in full bulk charge and the charging circuit was working.
It wasn't fast charging. The Apple 20W charger advertises 5V/3A and 9V/2.22A, and the iPad had settled on the 5V profile. That's the old 12W iPad rate — perfectly safe, just slower. Worth knowing if a customer ever asks why their iPad charges slowly: the usual culprits are the meter itself blocking USB-PD negotiation over the CC pins, a cable that can't do PD, or simply a battery that's warm or already well charged.
Proving the board is alive when the screen tells you nothing
With power confirmed, the next job is establishing whether anything is running. On a black screen you have no feedback at all, so you have to get it from the computer.
Force restart: hold Home and the Power button together for about 10 seconds. Watch the power meter — the current dropping out and returning is the USB link going down and coming back, which means the device genuinely power-cycled and the SoC is executing code.
Then look at Device Manager, not just iTunes. This is where a lot of people go wrong. Turn on View, Show hidden devices and you will see every Apple device that has ever been plugged into that PC, greyed out. Turn hidden devices back off so only live hardware is listed, then unplug and replug and watch what actually appears. The Hardware Ids under the device's Properties tell you the state precisely:
USB\VID_05AC&PID_12A8 — booted normally into iPadOS.
USB\VID_05AC&PID_1281 — recovery mode.
USB\VID_05AC&PID_1227 — DFU mode.
On this iPad nothing appeared in normal mode at all. But holding Home and Power for a full 20 to 30 seconds — well past the point where it feels like nothing is happening — put it into recovery, and iTunes immediately reported "There is a problem with the iPad that requires it to be updated or restored".
That single message eliminates a huge amount. Recovery mode runs out of the bootloader, entirely independently of the operating system, so the board, the USB controller, the Lightning port and the cable are all provably healthy. A restore that then completes and verifies proves the storage as well.
Update first, then Restore — and why the order matters
These two options in iTunes are not the same thing, and choosing the wrong one first either loses the customer's data unnecessarily or wastes an hour.
Update reinstalls iPadOS over the top and leaves the data partition alone. Non-destructive. Always try this first.
Restore erases the device completely and rebuilds everything, including the user data area.
On this iPad the Update ran flawlessly, verified, and reported that the iPad would restart — and then nothing came back. That result is diagnostic in itself: if a clean reinstall of the operating system changes nothing, the corruption is in the data partition that the Update deliberately left untouched. Only a full Restore rebuilds that.
The DFU Restore ran clean, and the iPad booted for the first time.
Activation Lock: know the Apple ID before you start
This is the one that can turn a repairable iPad into a paperweight, so it belongs in your quote conversation, not your teardown.
After a Restore, the device demands the Apple ID that was signed in to it. There is no legitimate way around Activation Lock. Confirm the customer can produce that Apple ID and password before you begin, because if they can't, no amount of parts or skill will bring the iPad back.
iTunes shows a masked hint of the account — something like d•••@g•••.com — which is enough to check you're asking about the right one. If the device came from a school or workplace it may also be supervised or MDM-enrolled, and that's a conversation with whoever manages it rather than something to work around.
It boots now — but the screen is still black
With the iPad running and iTunes reporting the serial number, capacity and iPadOS version, we had a working tablet with no picture. Time to work out why.
Here is the gotcha that cost us most time. We checked repeatedly with a torch at a shallow angle in a dark room, looking for the faint ghost image that a dead backlight leaves behind. Nothing. Absolutely black, every time. That pointed at a dead LCD panel, or worse, a failed display circuit on the board.
Then the iPad was carried past a window in bright sunlight and the Wi-Fi setup screen was plainly readable.
A torch is not bright enough. If you are testing for this, use the brightest light you have at a shallow angle, and if there is any doubt at all, take the device outside into direct daylight. We nearly ordered the wrong part on the strength of a torch test.
That single observation changed the diagnosis completely: the LCD was rendering perfectly. The fault was the backlight.
Backlight or panel? The distinction that decides the bill
A backlight failure sits in one of two places, and they cost very different amounts to fix.
The LED string inside the LCD assembly. The LEDs run in series, so one going open circuit kills all of them. Fixed by replacing the panel — a straightforward parts job.
The backlight circuit on the logic board. Usually a blown series fuse or a failed driver. A new panel changes nothing, and it's microsoldering work.
The logic that separates them: if only the board-side backlight circuit had failed, the image would still have been visible under a torch, because the data path would be intact. It wasn't. And a single dead panel explains both the missing light and the missing image with one fault rather than two. That reasoning pointed at the panel, and it turned out to be right.
Ordering the right part: the terminology trap
The names sellers use overlap badly, and it's easy to spend £55 on the wrong thing.
Touch screen, digitiser, or glass is the outer front glass with the touch layer bonded to it. Around £20, the LCD is £50, you can sometimes get both for £55.
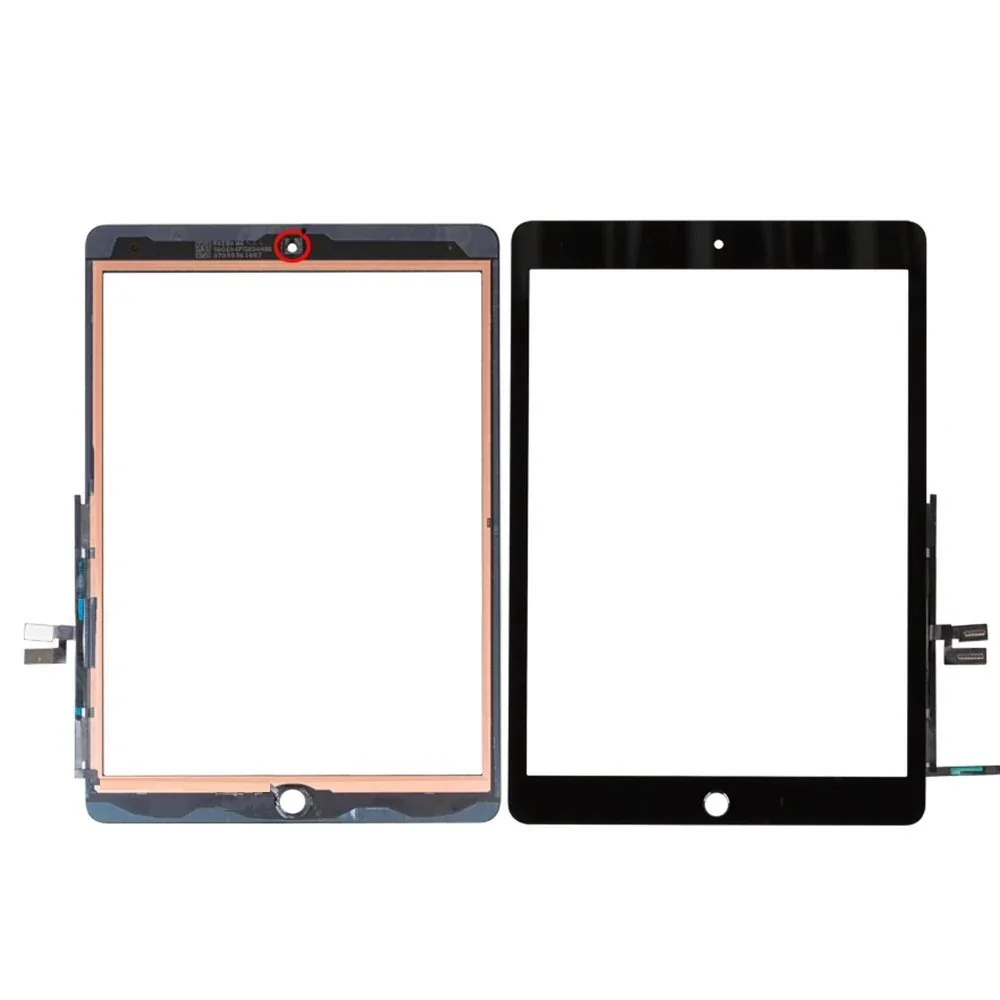
New IPAD Digitizer for touch input on IPAD 7th,8th & 9th Gen
Inner LCD is the panel that produces the image. This is the part a backlight or no-picture fault needs. Around £25 to £40.
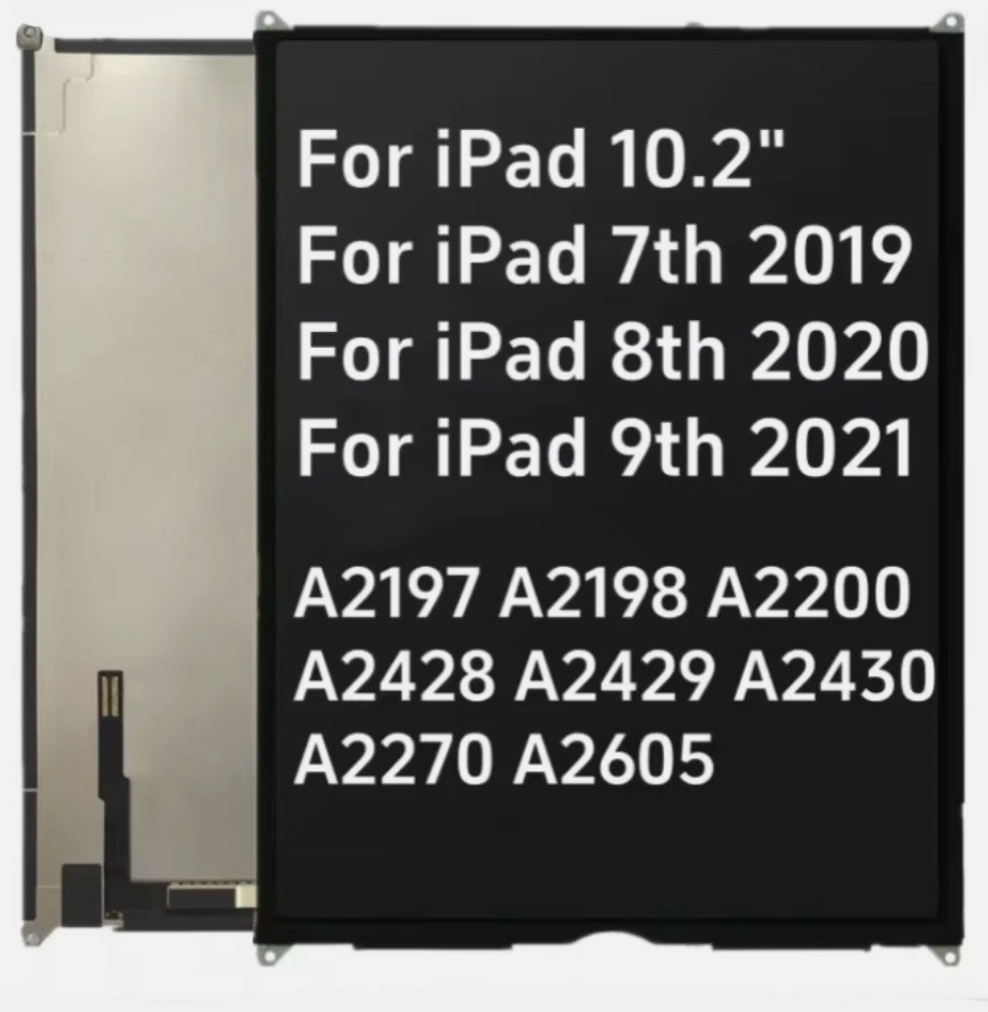
A compatilable IPAD 7th,8th & 9th gen LCD screen.
LCD and digitiser assembly is both, pre-bonded. Around £55, and the wrong construction for this iPad — the 9th generation display is not laminated, so the two parts are separate and fit separately.
Useful compatibility note: the 10.2-inch inner LCD is shared across the iPad 7 (2019), iPad 8 (2020) and iPad 9 (2021), so listings badged for all three are correct for the A2602, A2603, A2604 and A2605. Buy the adhesive strips at the same time, and buy from a supplier who accepts returns — with an intermittent or ambiguous fault, the part is also the test.
Opening an iPad 9 without wrecking it
The glass is bonded to the frame with adhesive and there is no gentle way in. Heat, patience, and knowing where not to go.
Warm the perimeter gradually with a heat pad or mat. Isopropyl alcohol run into the adhesive line helps it release and reduces how much heat you need.
Start at the top left and work down the left side. Take your time and let the adhesive give.
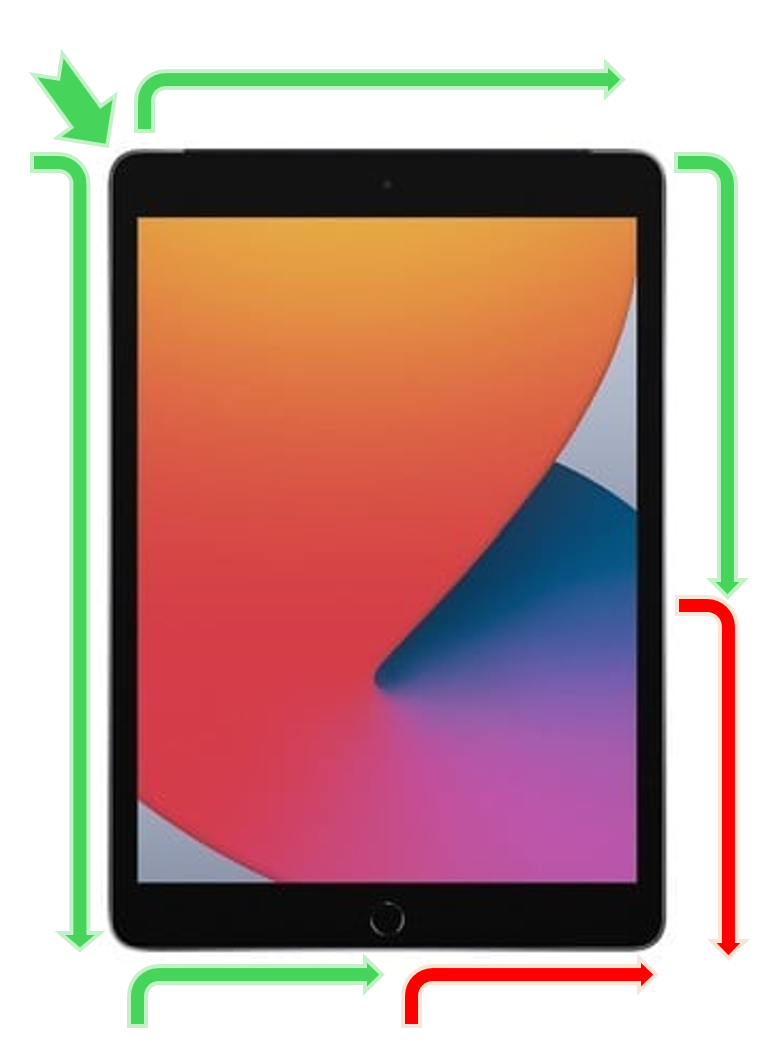
Opening an IPAD 7th,8th or 9th Gen IPAD, start top left and avoid bottom right.
Keep every tool away from the bottom right corner. The home button and digitiser flex cables run through there. Slice one and you have turned a screen job into a much bigger problem — and a damaged home button means losing Touch ID permanently, because it is cryptographically paired to that specific logic board, follow the pictire of green and red.
Plastic tools only. Picks and spudgers, never a blade or a metal spudger anywhere near the board.
Open it like a door, don't lever it up. Once the adhesive is released, hinge the glass open and prop it. Resist the urge to push tools in further to speed things up.
Four screws hidden under rubber pads hold the LCD down. Lift the pads, remove the screws, then work the panel loose slowly — it is a very tight fit.
The rule that saves logic boards
As soon as you can lift the LCD far enough to reach it, disconnect the battery before touching anything else. Remove the bracket screw, disconnect the connector, and slip a non-conductive card or a strip of plastic underneath so it cannot spring back into contact. You can flex the top of the logic board up very slightly to get access.
Take out the scew and you can flex up with a plastic pry tool in the gap in the logic board (top green arrow), while you slip a non-conductive slim piece of paper/card or plastic fully under the connector (left-hand green arrow).
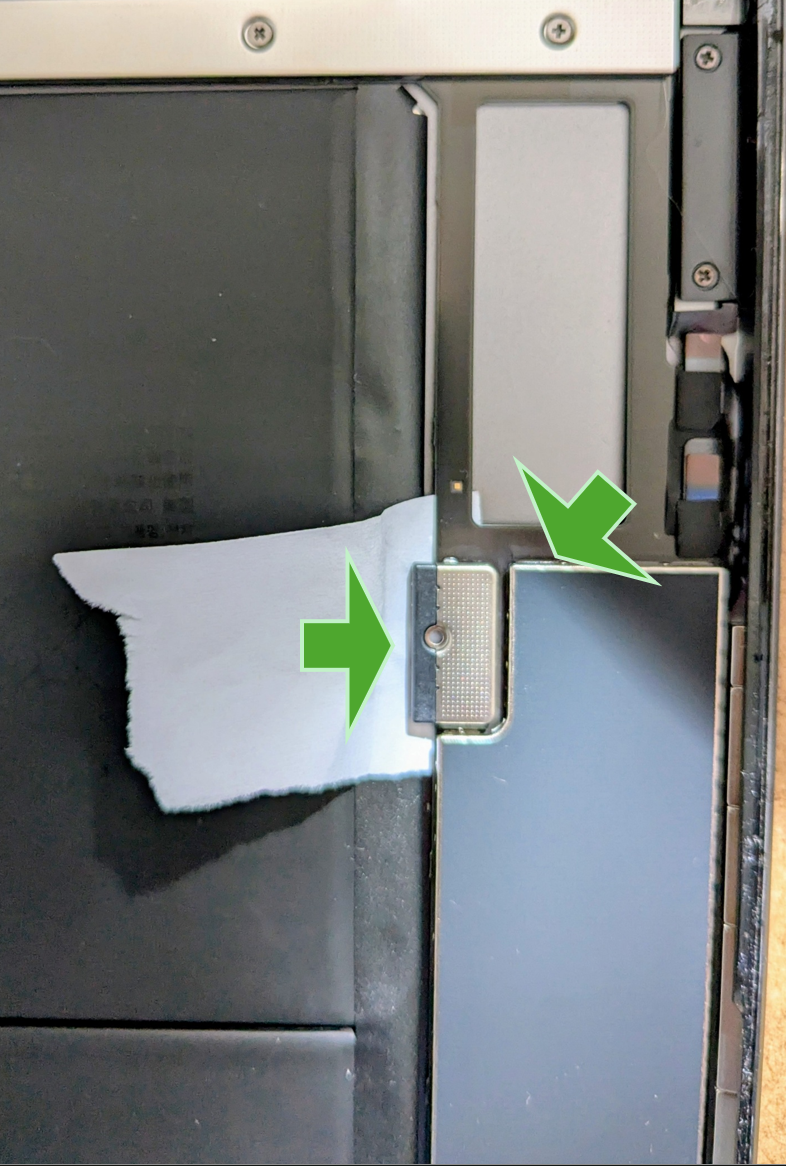
IPAD disconnect battery location
Never connect or disconnect the display with the battery attached. The display connector carries the backlight rail at around 15 to 20V, and hot-plugging it is the textbook way to blow the backlight fuse on the board. That is a self-inflicted microsoldering job on top of whatever you came in to fix.
Everything before the glass lifts is a mechanical risk. Everything after it is an electrical one.
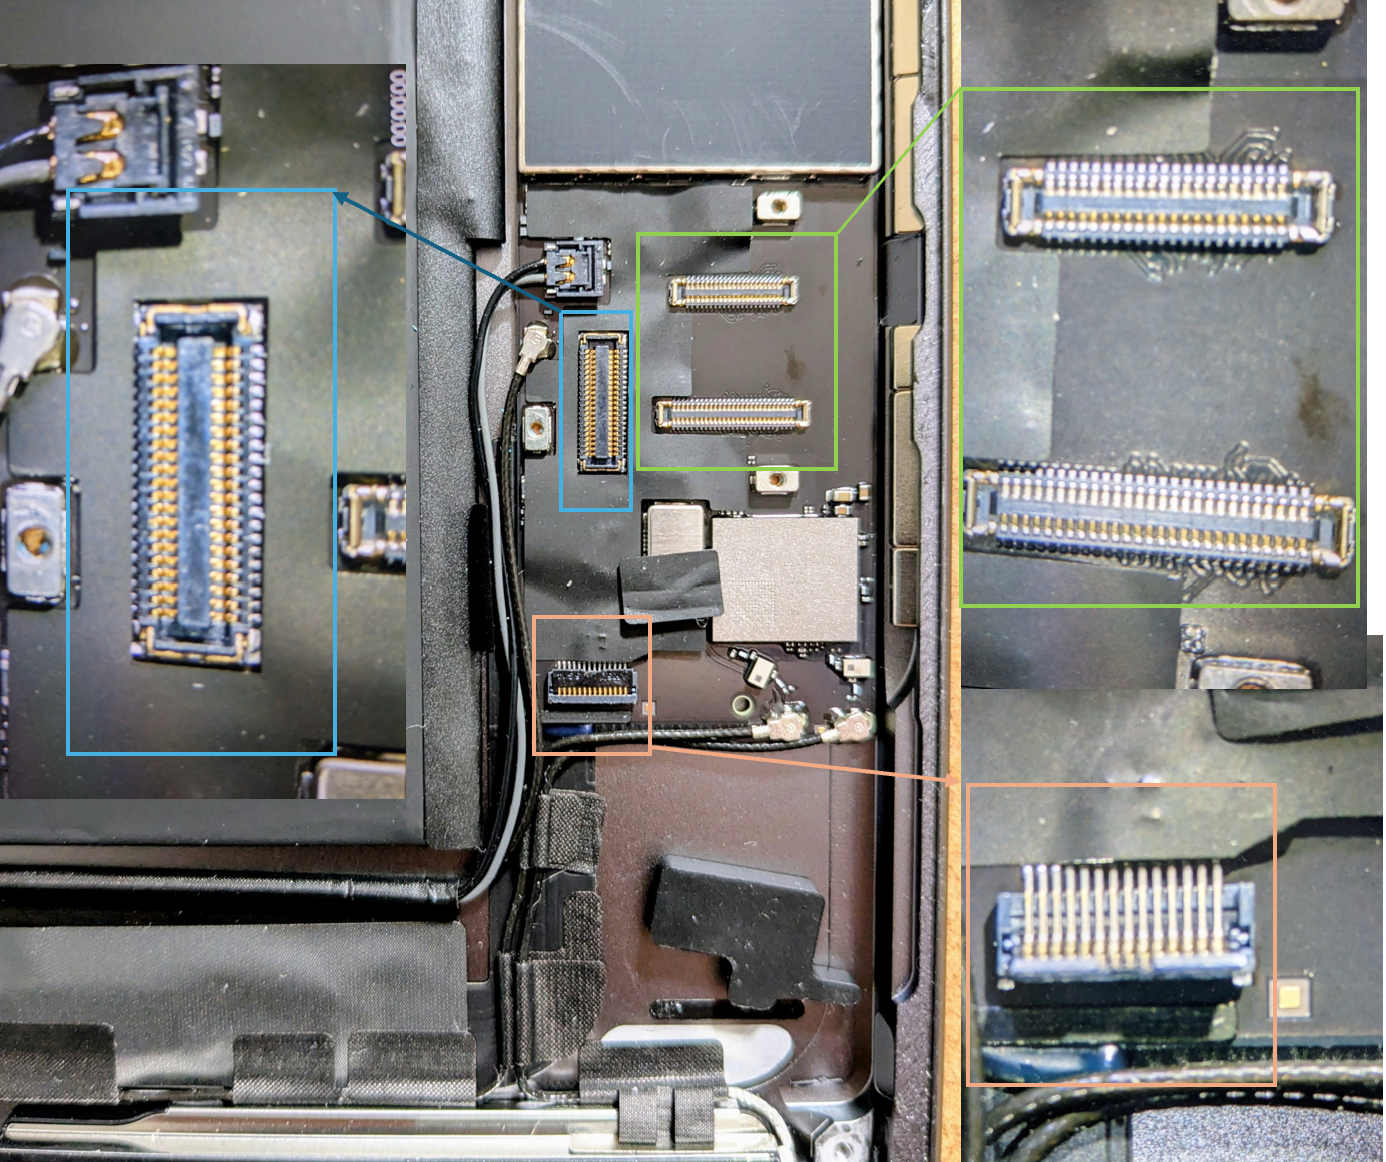
Zoom in view of the IPAD connectors digitizer, LCD & home button
The new panel went in and the backlight came back
The replacement inner LCD lit up first time. Original fault solved: the LED string in the customer's panel had failed, the board's backlight circuit was fine all along, and no board-level work was needed.
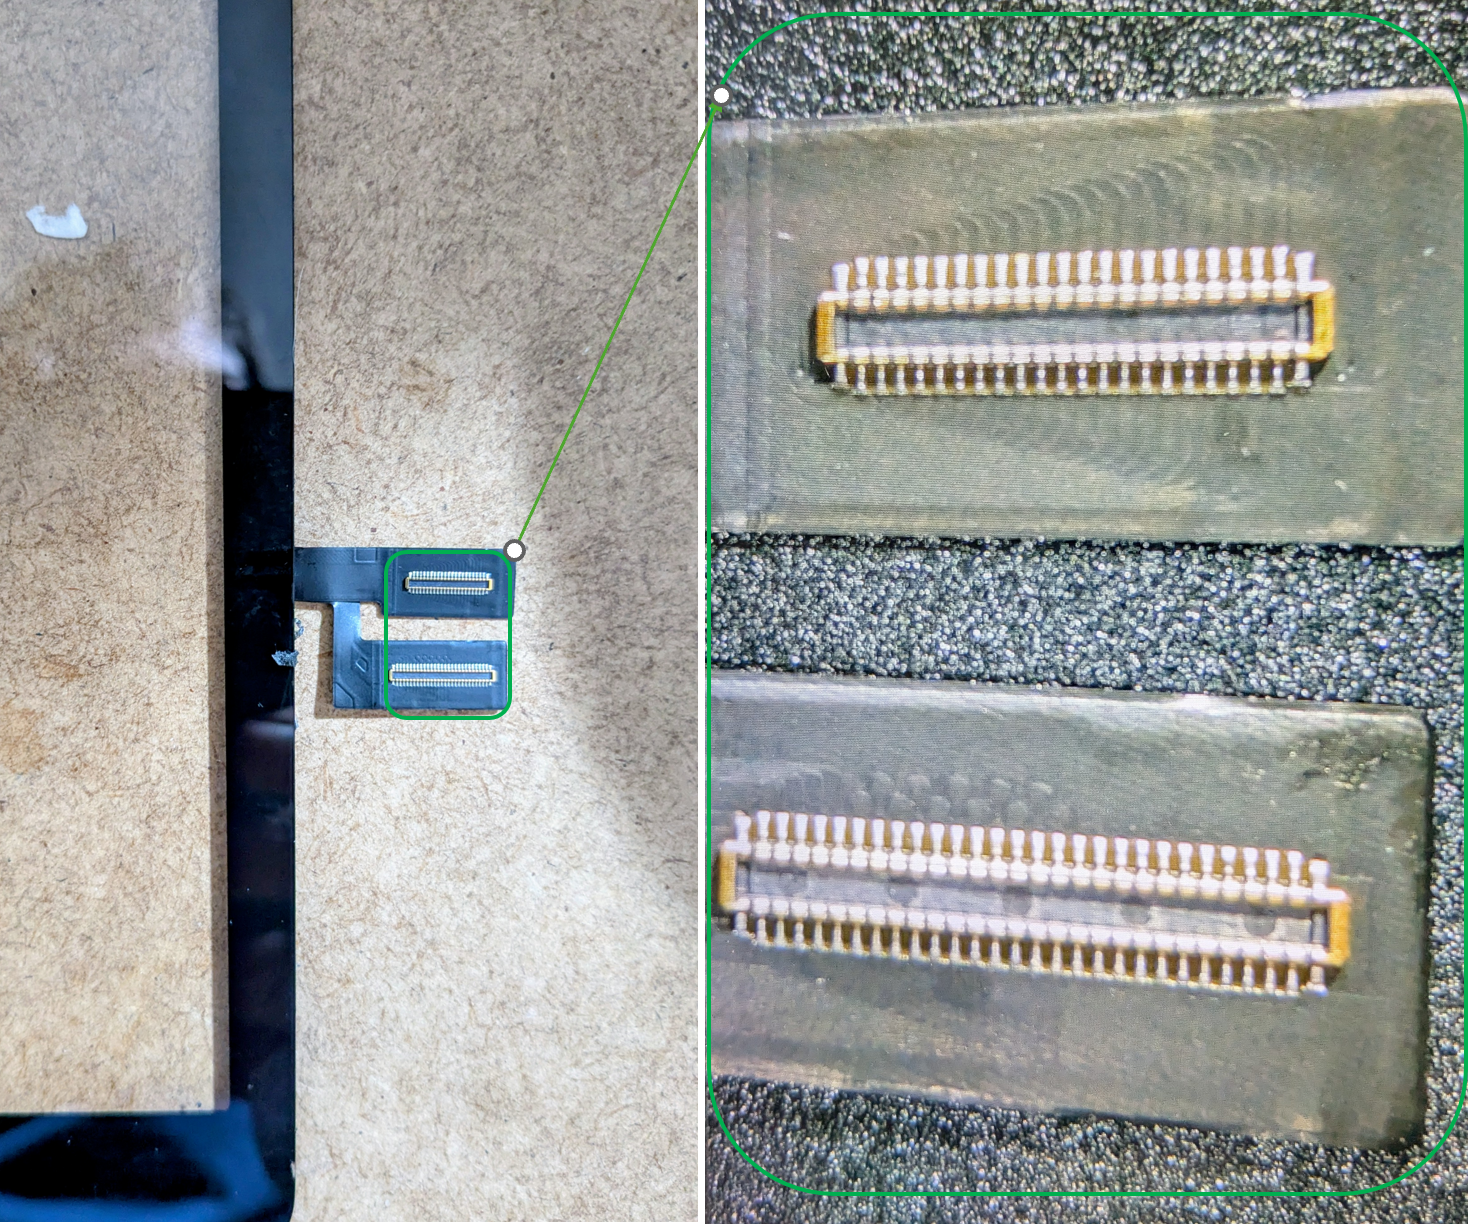
Apple IPAD 7th,8th & 9th Gen Digitizer connector zoom in
Then the touch went wrong
With a picture back we could finally see what the touchscreen was doing, and it was misbehaving badly — clicking and flicking on its own, and one finger press registering as three or five taps.
A replacement digitiser behaved exactly the same. That is the point where it is very tempting to keep ordering parts.
The test that actually settled it: swap the panels into a known-good donor iPad. Both digitisers worked perfectly in the donor. That proved the panels were fine and the fault was in the customer's iPad — a conclusion we could have reached before buying a second digitiser, and the honest lesson from this job is to run the cross-test first if you have a donor available.
Back on the customer's board, the behaviour had a pattern worth noticing: the far right of the screen responded perfectly, and the further left you touched the worse the rapid-fire repeats became. A gradient across the panel like that is a signal integrity problem, not a random fault — it points at the connection rather than the glass.
Two bent pins
Under a digital microscope, the digitiser socket on the logic board had two bent pins. Straightened carefully with tweezers, reseated, and the touchscreen worked perfectly across the whole panel.
Two things worth taking from that. These connectors are extremely delicate — the sockets are small enough that a pin can fold over during a reseat without you feeling a thing. And a digital microscope earns its place in this kind of work; those pins were invisible to the naked eye and no amount of cleaning, reseating or reassembly would ever have fixed them.
One more thing worth knowing while you are chasing touch problems: iPadOS has no touch calibration or sensitivity setting. Unlike Android or Windows, it isn't user-adjustable. The nearest thing is Ignore Repeat under Settings, Accessibility, Touch, Touch Accommodations — useful as a diagnostic to confirm you're seeing genuine duplicate touches, but not a fix, and not something to hand back to a customer relying on.
The result
Reassembled, set up and tested, the iPad is working normally — display, backlight, touch and Touch ID all correct. Total parts: one inner LCD.
Three separate faults, and the sequence mattered. If we had ordered a screen at the start, based on a black display, it would have gone into an iPad that still wouldn't boot and we would have learned nothing.
If you've got one of these
If you have an iPad that appears completely dead, don't assume it's finished. The order we'd suggest, and the order we used:
Confirm it's charging with a meter rather than guessing.
Confirm the board is alive by forcing it into recovery and watching what the PC reports.
Try an Update before a Restore, and make sure the Apple ID is available before you commit to either.
Test for a working panel in direct daylight, not with a torch.
Cross-test parts in a donor device before you buy replacements.
And inspect every connector under magnification before you conclude anything is faulty.
This applies to the iPad 9th generation (A2602, A2603, A2604, A2605) and largely to the iPad 7 and iPad 8 as well, which share the same 10.2-inch panel and much of the same construction.
If your iPad has a black screen, won't switch on, won't hold charge, or has a touchscreen that has started doing its own thing, it is very often repairable — and very often not the fault it first appears to be. Optimised Computing covers iPad and tablet diagnosis, screen and battery replacement, and data recovery across Hereford and Herefordshire, including Ledbury, Leominster, Ross-on-Wye, Bromyard and Kington — get in touch and I'll come to you.
| Generation | Model (A-number) | Connectivity | EMC | Identifier |
|---|---|---|---|---|
| iPad 7 (2019) | A2197 | Wi-Fi | 3323 | iPad7,11 |
| A2198 | Wi-Fi + Cellular (Global) | 3324 | iPad7,12 | |
| A2199 | Wi-Fi + Cellular (China) | 3324 | iPad7,12 | |
| A2200 | Wi-Fi + Cellular (US/Canada) | 3324 | iPad7,12 | |
| iPad 8 (2020) | A2270 | Wi-Fi | 3574 | iPad11,6 |
| A2428 | Wi-Fi + Cellular (US/Canada) | 3575 | iPad11,7 | |
| A2429 | Wi-Fi + Cellular (Global) | 3575 | iPad11,7 | |
| A2430 | Wi-Fi + Cellular (China) | 3575 | iPad11,7 | |
| iPad 9 (2021) | A2602 | Wi-Fi | 4045 | iPad12,1 |
| A2603 | Wi-Fi + Cellular (US/Canada) | 4046 | iPad12,2 | |
| A2604 | Wi-Fi + Cellular (Global) | 4046 | iPad12,2 | |
| A2605 | Wi-Fi + Cellular (China) | 4046 | iPad12,2 |
| Part | Cross-compatible? | Notes |
|---|---|---|
| Inner LCD | Yes — all 12 models | The part that fixes a no-picture or backlight fault. Sold as "iPad 7/8/9 10.2 LCD". |
| Digitiser (touch glass) | Usually — check the listing | Most suppliers sell one part for all three generations; a few stock them separately. Buy a listing naming your A-number. |
| Battery | Yes — all 12 models | Same cell across iPad 7, 8 and 9. |
| Home button / Touch ID | Fits, but never swap it | Paired to its original logic board. A donor button works as a button but Touch ID is permanently dead. Always transfer the original. |
| Display construction | Non-laminated on all three | LCD and digitiser are separate parts, fitted separately. Avoid pre-bonded assemblies. |
| iPad 10th gen (A2696, A2757, A2777) | No | 10.9-inch, USB-C, no home button. Nothing here fits it. |